如何制作网站客户留言功能
客户留言功能是很多网站中都有的一个交互功能,可以让用户在网站前台直接提交留言,网站管理员可在网站后台查看用户留言。有的网站为了简化,直接嵌入一个网站独立客户留言系统,但这不太好,都可以自己用代码写一个网站客户留言功能。(如果你对代码不懂,可以学习一下HTML入门教程)那么在自己做网站时,怎么制作网站客户留言功能呢?

下面学做网站论坛就以wordpress程序为例,介绍一下网站客户留言功能制作方法。
方法/步骤
第一步:将Wordpress顶部模板header.php上面添加以下的网站信息提交验证代码:
<?php

if( isset($_POST['tougao_form']) && $_POST['tougao_form'] == 'send') {

global $wpdb;

$current_url = '/'; // 注意修改此处的链接地址

$last_post = $wpdb->get_var("SELECT 'post_date' FROM '$wpdb->posts' ORDER BY 'post_date' DESC LIMIT 1");// 表单变量初始化

$name = isset( $_POST['tougao_authorname'] ) ? trim(htmlspecialchars($_POST['tougao_authorname'], ENT_QUOTES)) : '';

$tellhm = isset( $_POST['tougao_authortell'] ) ? trim(htmlspecialchars($_POST['tougao_authortell'], ENT_QUOTES)) : '';

$category = 23;

$content = isset( $_POST['tougao_content'] ) ? trim(htmlspecialchars($_POST['tougao_content'], ENT_QUOTES)) : '';// 表单项数据验证

if ( empty($name) ) {

wp_die('姓名必须填写!<a href="'.$current_url.'">返回</a>');

}


if ( empty($tellhm) ) {

wp_die('电话必须填写!<a href="'.$current_url.'">返回</a>');

}


if ( empty($content) ) {

wp_die('内容必须填写!<a href="'.$current_url.'">返回</a>');

}


$title =$name.'电话: '.$tellhm;

$post_content = '<p>内容:'.$content.'</p>';


$tougao = array(

'post_title' => $title,

'post_content' => $post_content,

'post_category' => array($category)

);


// 将文章插入数据库

$status = wp_insert_post( $tougao );


if ($status != 0) {

wp_die('提示成功!!<a href="'.$current_url.'">返回</a>', '提示成功!');

}

else {

wp_die('提示失败!<a href="'.$current_url.'">返回</a>');

}

}?>
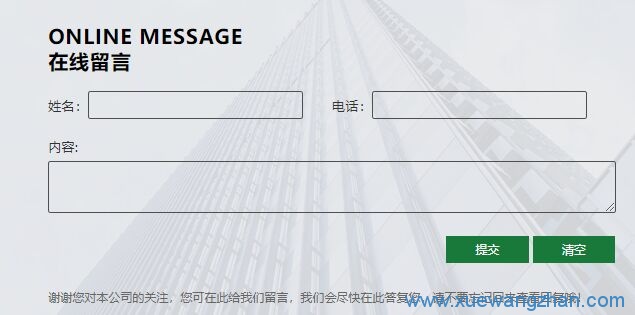
第二步:在需要显示用户留言框的区域,使用以下的代码来制作如上图的用户留言框;
<div class="index_kj index_box6">

            <img src="<?php echo get_template_directory_uri(); ?>/images/index_liuyan.jpg">

            <div class="index_liuyan">

               <div class="hd">

                   <h2>Online Message<br>在线留言</h2>


                </div>

               <div class="bd">


                <form method="post" action="<?php echo $_SERVER["REQUEST_URI"]; $current_user = wp_get_current_user(); ?>" id="messageForm">

                   <div class="ipbox">


                    <label>姓名:</label><input type="text" name="tougao_authorname" class="iptext UserName" required>

                    <label>电话:</label><input type="text" name="tougao_authortell" class="iptext" required>


                    </div>

                   <div class="ipbox"><label>内容:</label><br>


                    <textarea name="tougao_content" cols="20" rows="2" class="textarea" id="GuestBook_Content"></textarea></div>


                    <div class="ipbox" style="text-align:right">

                    <input type="hidden" value="send" name="tougao_form" />

                    <input name="submit" type="submit" class="botton" value="提交">

                    <input name="reset" type="reset" class="botton" value="清空">

                    </div>

                    </form>

                </div>

                <div class="fd">谢谢您对本公司的关注,您可在此给我们留言,我们会尽快在此答复您,请不要忘记回来查看回复哦!</div>

            </div>

        </div>
第三步:在CSS样式文件里添加以下的CSS样式代码,用于控制留言框的样式。
.index_liuyan { width:1060px; height:420px;background-color: rgba(232,233,235,0.9); position:absolute; top:53%; left:50%; margin:-200px 0 0 -530px; z-index:100}

.index_liuyan .hd { max-width:680px; margin:40px auto 20px; font-size:24px; color:#000; text-transform:uppercase; line-height:30px; }

.index_liuyan .bd { max-width:680px; margin:0 auto; }

.index_liuyan .fd { max-width:680px; margin:30px auto; }


.ipbox{ width:100%;color:#333;font-size:16px; margin-bottom:15px; line-height:35px;box-sizing: border-box}

.iptext { border:0; width:250px; height:25px; line-height:25px; padding:3px; background-color:transparent; border:1px solid #4f4f50; border-radius:3px;}


.textarea { width:100%; height:60px;background-color:transparent;border:1px solid #4f4f50; border-radius:3px;}

.botton { padding:0px 35px; height:32px; line-height:30px; text-align:center;border:0;color:#fff; background-color:#19793a; cursor:pointer; font-size:14px}

.UserName { margin-right:30px;}
通过以上的代码就可以制作出一个前台留言框功能,用户提交的留言将显示在网站后台。
如果你不想自己写代码制作用户留言板功能,也可以使用WordPress留言板插件contact-form-7。

