网站图片鼠标悬停放大预览功能制作方法
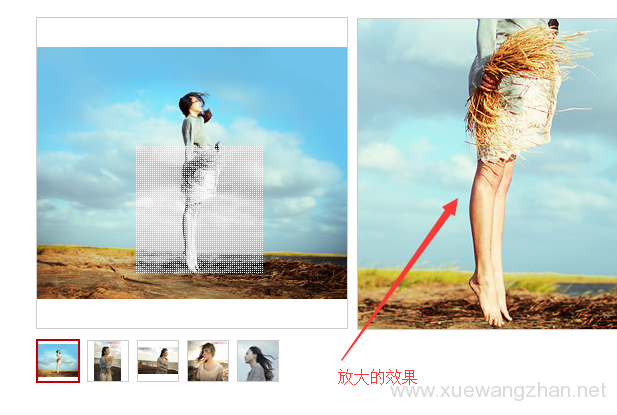
很多企业网站或者商城网站制作都有这样的功能,图片展示切换效果上面有图片放大预览功能。如下图:

在自己做网站时,怎么制作这样的网站商品图片放大预览功能呢,下面学做网站论坛介绍一下制作方法。
方法/步骤
- 下载图片放大预览功能插件JS文件,下载链接: https://pan.baidu.com/s/1stJRm02Gz5xgag1NzlIa4g 提取码: 9iny;
- 在代码的头部引入JQUERY和插件JS文件;(注意修改路径)
<script src="js/jquery.js"></script>

<script src="js/mag.js"></script>

<script>

$(function(){

/*

show //正常状态的框

bigshow // 放大的框的盒子

smallshow //缩小版的框

mask //放大的区域(黑色遮罩)

bigitem //放大的框

*/

var obj = new mag('.show', '.bigshow','.smallshow','.mask','.bigitem');

obj.init();

});

</script> - 在样式代码里,放在以下的样式代码,用于控制放大镜功能的样式;
<style>

.bg{width:920px;height: 540px;margin:0 auto;padding:20px;border:1px solid #E8E8E8;overflow: hidden;min-width: 900px;box-sizing: border-box;background: #fff;}

.bg_left{width: 430px;height:auto;float: left}

.bg_right{float: left;z-index:999;position:relative}

.show{width: 430px;height: 430px;margin-bottom: 10px;position: relative;border:1px solid #E8E8E8;cursor:move}

.show img{width: 430px;height: 430px;}

.mask{width: 215px;height: 215px;background: #000;filter: Alpha(opacity=50);opacity:0.5;position: absolute;top: 0;left: 0;display: none;}

.bigshow{width: 430px;height: 430px;overflow: hidden;margin-left: 10px;display: none;border:1px solid #E8E8E8;}

.bigshow img{width: 860px;height: 860px;margin-right: 10px;}

.smallshow{width: 100%;height: 70px;position: relative}

.smallshow img{width:100%;border:1px solid #e8e8e8;box-sizing: border-box;transition: all 0.5s}

.smallshow>.middle_box{margin-left: 30px;margin-right: 30px;width:370px;overflow: hidden;height: 70px;}

.smallshow .middle{overflow: hidden;transition: all 0.5s;height: 70px;}

.smallshow .middle>li{width: 64px;height: 64px;float: left;cursor:pointer;padding:0 5px;}

.smallshow>p{position: absolute;top:50%;width: 22px;height: 32px;margin-top: -16px;}

.smallshow>.prev{left: 0;background: url(img/hover-prev.png) no-repeat;transition: all 0.5s}

.smallshow>.next{right: 0;background: url(img/hover-next.png) no-repeat;transition: all 0.5s}

.smallshow>.prev.prevnone{left: 0;background: url(img/prev.png) no-repeat;cursor: not-allowed}

.smallshow>.next.nextnone{right: 0;background: url(img/next.png) no-repeat;cursor: not-allowed}

</style> - 在显示放大镜功能的位置,放上以下的HTML代码,用于显示放在镜预览功能框;(注意修改图片路径)
<div class="bg">

<div class="bg_left">

<div class="show">

<img src="Document_files/img1.png" alt="">

<div class="mask" style="display: none; left: 215.4px; top: 95.7px;"></div>

</div>

<div class="smallshow">

<p class="prev prevnone"></p>

<div class="middle_box">

<ul class="middle" style="width: 592px;">

<li><img src="Document_files/img1.png" alt="" style="border: 2px solid rgb(255, 68, 0);"></li>

<li><img src="Document_files/img2.png" alt=""></li>

<li><img src="Document_files/img3.png" alt=""></li>

<li><img src="Document_files/img4.png" alt=""></li>

<li><img src="Document_files/img5.png" alt=""></li>

<li><img src="Document_files/img6.png" alt=""></li>

<li><img src="Document_files/img7.png" alt=""></li>

<li><img src="Document_files/img8.png" alt=""></li>

</ul>

</div>

<p class="next "></p>

</div>

</div>

<div class="bg_right">

<div class="bigshow" style="display: none;">

<div class="bigitem" style="width: 861.601px;">

<img src="Document_files/img1.png" alt="" style="margin-left: -431.201px; margin-top: -191.578px;">

</div>

</div>

</div>

</div> - 这样网站商品图片放大预览功能就制作好了。
